Spatial Filtering
Spatial Filtering는 spatial filters을 이용해 전처리를 하는것으로, spatial mask, kernel, templates, windows 등으로 불린다.
Spatial filtering하는 방법은 간단하다. 영상의 좌상단부터 이동하면서 saptial 필터를 적용한다.
Spatial filters을 수행하고 싶은 특정한 픽셀을 가운데로 놓고 필터를 위치시킨다. 이 때 필터는 보통 3x3, 5x5, 7x7크기이다. 영상의 픽셀값과 그에 위치하는 필터값을 곱한 값을 모두 더한값으로 변환시킨다.

만약 3x3 saptial filters를 사용한다면, f(x,y)값에 g(x,y) = w(-1,-1)f(x-1,y-1)+w(-1,0)f(x-1,y) +…w(0,0)f(x,y)+…w(1,1)f(x+1,y+1) 을 계산해서 변환시켜준다.
Saptial filter는, Spatial filter의 계수가 어떠냐에 따라서 다양한 결과를 만들 수 있다.
Averaging filter(평균화 필터)
말 그대로 특정한 필터 값에 있는 이웃들의 평균으로, 때때로 averaging(평균화 필터) 또는 low pass filters(저역 통과 필터)라고도 한다. 모든 픽셀에 대해, 이웃 intensity levels의 평균 픽셀 값으로 변환한다.
랜덤 노이즈를 감소시키는 장점이 있지만, 이미지가 흐려지는(blur) 단점이 있다.


Gaussian filter (가우시안 필터)

가중치평균을 수행할 때, 그 가중치를 가우시안 함수를 이용해서 구하는 것으로, 가우시안 필터에서는 마스크의 크기가 중요하다!
마스크의 크기가 작을수록 작은 잡음을 blur 시킬 수 있고(없앨 수 있고), 반대로 큰 잡음을 blur 시키고싶으면 마스크의 크기를 크게 잡으면 된다. 이 때, 마스크를 크게 잡으면 연산량이 많아진다는 단점이 있다.

Sharpening
밝기값의 차이가 나는 부분을 더 강조시킴으로서 보다 에지있게 하는 방법으로, 선명하게 만드는 것을 주 목적으로 intensity의 변환을 강조한다.

sharpening을 하는 방법에는 2가지가 있다.
먼저, 공간도메인에서의 2차 미분을 구하는 방식으로 수행하는 것이다.
값의 변화가 발생하는 부분을 더 강조하는 것이 sharpening임으로 오른쪽의 급격한 변화가 일어나는 부분을 좀 더 강조하기 위해 미분을 취한다. 미분에는 1차 미분과 2차 미분이 있는데, 왼쪽같이 일정한 변화량이 일어나는 부분을 변화를 덜 강조할 수 있는 2차미분을 사용한다.


알고리즘은
1. 모든 픽셀에 대한 2차 미분을 구한 뒤,
2. 원본 영상에 이 이미지를 더한다.
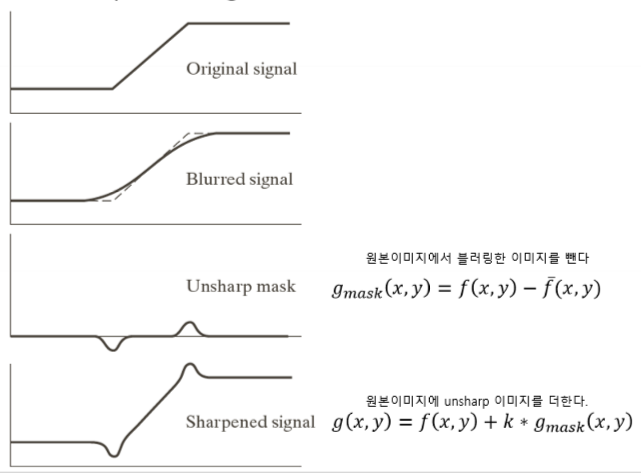
두번째는, unsharp masking을 사용하는 방법이다.
1. 원본 영상에 블러처리를 하고,
2. 원본 영상에서 블러링한 영상를 뺀다. 이때 이 영상을 unsharp 라고한다.
3. 마지막으로 다시 원본 영상에 unsharp 영상를 더한다

Median filter(중앙값 필터)
- Median value(중앙값)은 3X3 이웃의 경우 5 번째로 큰 것이고, 5X5 이웃의 경우 13 번째로 큰것이다.
medain filter는 마스크의 중앙값을 찾아, 마스크의 픽셀 값을 그 중앙값으로 바꾸는 것이로, 만약 mxm median filter 사용시 크기가 m^2/2 이하인 노이즈를 제거 가능하다.
하지만 Average와 가우시안 필터링에 비해 연산량이 많다는 단점과 impulse noise(임펄스 노이즈) 또는 salt-and-pepper(소금과 후추 노이즈)가 있을 때 효과적이라는 단점이 있다.
(* salt-and-pepper : salt는 흰색, pepper는 검정을 의미)

example code
//Averaging filtering

#include <opencv2/core.hpp>
#include <opencv2/videoio.hpp>
#include <opencv2/highgui.hpp>
#include <opencv2/imgproc.hpp>
#include <iostream>
#include <stdio.h>

using namespace cv;
using namespace std;

int main() {
	Mat image, AvgImg, GaussianImg;
	image = imread("zx.png");

	// Blurs an image using the normalized box filter
	// image: input image, AvgImg: output image, Size(5, 5): blurring kernel size
	blur(image, AvgImg, Size(5, 5));

	// Blurs an image using a Gaussian filter
	// image: input image, GaussianImg: output image, Size(5, 5): Gaussian kernel size
	// 1.5: Gaussian kernel standard deviation in X direction
	GaussianBlur(image, GaussianImg, Size(5, 5), 1.5);

	imshow("Input image", image);
	imshow("Average image", AvgImg);
	imshow("Gaussian blurred image", GaussianImg);

	waitKey(0);
	return 0;
}
// Sharpening
#include <opencv2/core.hpp>
#include <opencv2/videoio.hpp>
#include <opencv2/highgui.hpp>
#include <opencv2/imgproc.hpp>
#include <iostream>
#include <stdio.h>
using namespace cv;
using namespace std;
int main() {
Mat image, laplacian, abs_laplacian, sharpening;
image = imread("zx.png", 0);
GaussianBlur(image, image, Size(3, 3), 0, 0, BORDER_DEFAULT);
// calculates the Laplacian of an image
// image: src, laplacian: dst, CV_16S: desire depth of dst,
// 1: aperture size used to compute second-derivative (optional) 마스크의 크기
// 1: optional scale factor for the computed Laplacian values 라플라시안? 부분에 특정한 값을해주고 싶을때
// 0: optional delta value that is added to the result 특정한 값을 더해주고 싶을때, 0이면 그대로의 값을 가지고가겠다.
//Laplacian(image, laplacian, CV_16S, 1,1,0);
Laplacian(image, laplacian, CV_16S, 5,5,5); // 2차미분수행
convertScaleAbs(laplacian, abs_laplacian); // 8비트영상으로 바꿔줌
sharpening = abs_laplacian + image;
imshow("Input image", image);
imshow("Laplacian", laplacian);
imshow("abs_Laplacian", abs_laplacian);
imshow("Sharpening", sharpening);
waitKey(0);
}// Unsharp
#include <opencv2/core.hpp>
#include <opencv2/videoio.hpp>
#include <opencv2/highgui.hpp>
#include <opencv2/imgproc.hpp>
#include <iostream>
#include <stdio.h>
using namespace cv;
using namespace std;
int main() {
Mat input = imread("zx.png");
Mat gray, blur, sharp;
cvtColor(input, gray, COLOR_BGR2GRAY);
GaussianBlur(gray, blur, Size(5, 5), 3);
addWeighted(gray, 1.5, blur, -0.5, 0, sharp); // gray(가중치 1.5)와 blur(가중치 -0.5) 영상을 더해줌
imshow("gray", gray);
imshow("sharp", sharp);
waitKey(0);
}// Median filter
#include <opencv2/core.hpp>
#include <opencv2/videoio.hpp>
#include <opencv2/highgui.hpp>
#include <opencv2/imgproc.hpp>
#include <iostream>
#include <stdio.h>
using namespace cv;
using namespace std;
int main() {
Mat image = imread("y.png", 0);
imshow("SaltAndPepper", image);
Mat mf1, mf2;
// Blurs an image using the median filter
// image: src, mf1: dst, 3: aperture size(must be odd and greater than 1)
medianBlur(image, mf1, 3);
imshow("MedianFiltered1", mf1);
medianBlur(image, mf2, 9);
imshow("MedianFiltered2", mf2);
waitKey(0);
return 0;
}
이 게시물은 한동대학교 황성수 교수님의 컴퓨터비전 강의를 공부하며 정리한 내용입니다.
'Computer Vision' 카테고리의 다른 글
| [OpenCV] 영상 분할(Image Segmentation) (0) | 2020.01.19 |
|---|---|
| [OpenCV] 컬러영상처리(Color Processing) (0) | 2020.01.19 |
| [OpenCV] 히스토그램 평활화(Histogram Equalization) (0) | 2020.01.19 |
| [OpenCV] 밝기값 변환(Intensity Transformation) (0) | 2020.01.18 |
| [OpenCV] 메모리 관리 및 픽셀 액세스(Memory Management/Pixel Access) (0) | 2020.01.11 |
![[OpenCV] 공간 도메인 필터링(Spatial Filtering)](https://img1.daumcdn.net/thumb/R750x0/?scode=mtistory2&fname=https%3A%2F%2Fblog.kakaocdn.net%2Fdna%2FcnHr38%2FbtqBkOwoTlz%2FAAAAAAAAAAAAAAAAAAAAAAiRCWl4cgPeTb-EN_TKY_78SKp3JLE8EvNy_prtA9b3%2Fimg.png%3Fcredential%3DyqXZFxpELC7KVnFOS48ylbz2pIh7yKj8%26expires%3D1772290799%26allow_ip%3D%26allow_referer%3D%26signature%3Db6SGirvY9Yie3afDfM83iRlsuIs%253D)